Wednesday, October 3, 2012

NetApp Ontap 8.x Cluster Mode Administration


Setting up the NetApp ontap 8mode cluster:

Boot the server.
Press Ctrl+c for Advance boot menu.


Press the setup. First Setup the cluster environment.

Setting up the Management interface, ipaddress and protocol.


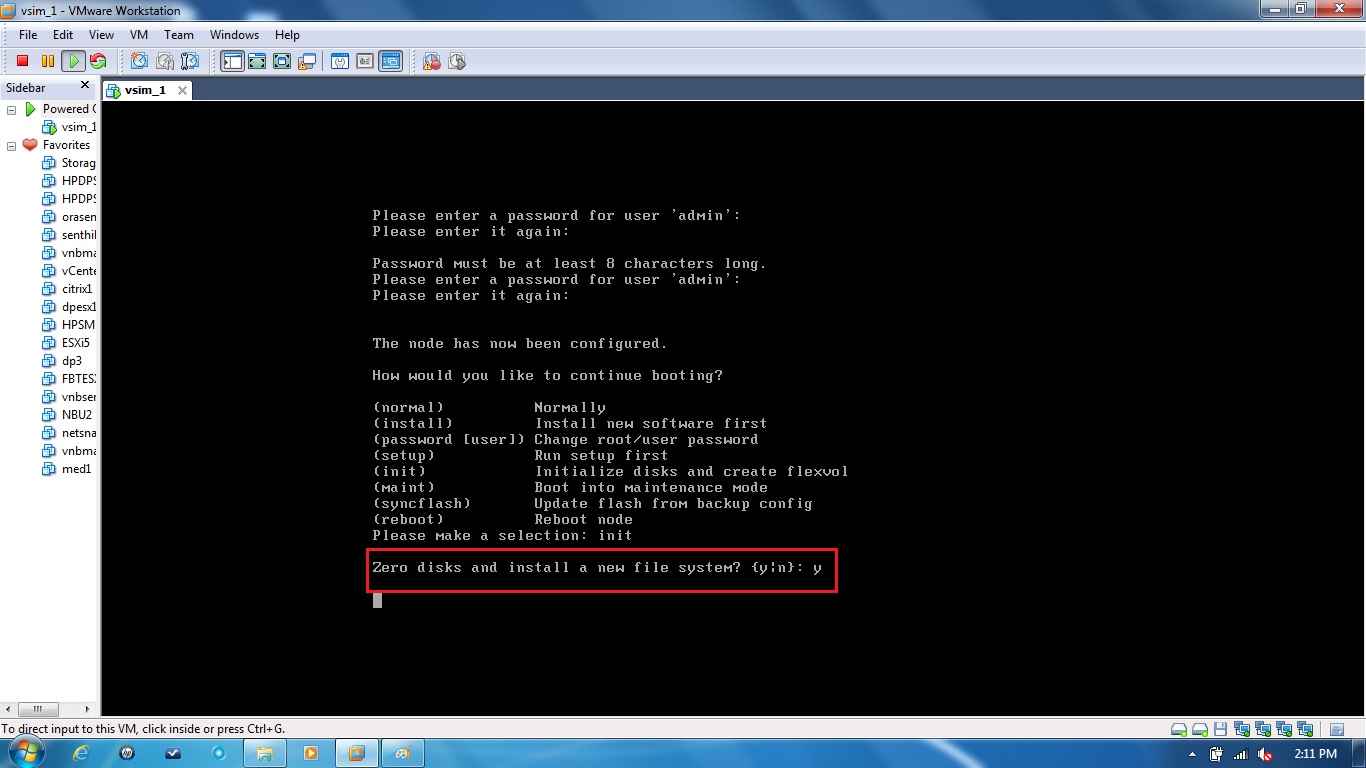
Setting the admin user and password.


Then you go for init command.

This zero the disks and initialize.


Zeroing disks starts.


Once you login with the admin user name and password.

Press "?" for help. This list the group commands.


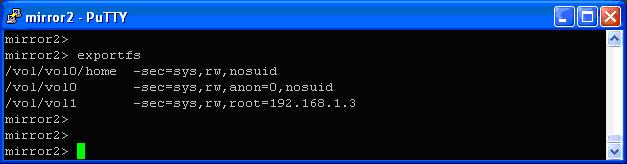
Using security and login you can create a new user account.


security login show command lists all the users information.


You can create an user account using security login create --username senthil --application ssh --authmethod password --role admin.

The above command creates the user senthil with admin role and protocol is ssh.
So the user can login through ssh.


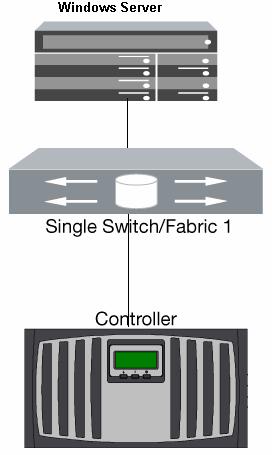
Accessing the Filer through putty.


Accessing the NetApp Element Manager, to manage the cluster environment.


Element manager dash board.


Complete Cluster Information.


Network interface management. You can add the ipaddress and manage it.


We are adding the cluster management interface.


Interface created successfully.


Detailed information about the interface.


Newly added interface is available.


Listing All the interfaces.


Creating cluster... Cluster process Started.


In cli list the cluster information.

Run the following command:
cluster show 


Available Node in test cluster.


Listing the interface information. Use the following command:

network interface show


Cluster view output. You can check the performance of the cluster.


Now you have two nodes in the cluster. (FASCLUS1 and FASCLUS2)


Run the following command to list the cluster nodes.


Friday, July 20, 2012

Configure Storage System for NFS Redhat Linux (UNIX)


CONFIGURE STORAGE SYSTEM FOR NFS REDHAT LINUX (UNIX)


1. Execute the Setup command.

    > setup


2. If need create the aggregate and volume or use existing volume.


3. Record the IP address and host name for each entry in the /etc/hosts and check

    > ping xxx.xxx.xxx.xxx
    > ping Server Name

4. NFS will automatic export when volume created, to avoid

    > options nfs.export.auto-update off

5. Check whether NFS is license if not, add license using

    > license add xxxxxxx

5. Check the qtree security is in UNIX, if not

    > qtree security  ( volume path | qtree path ) UNIX


6. export the volume or qtree using exportfs command

   Syntax: exportfs -io rw,root="Host IP addrress"  volume path

   > exportfs -io rw,root=10.10.10.10   /vol/vol1    = This entry in memory not in /etc/exports


   > exportfs 


   > exportfs -p  rw,root=10.10.10.10  /vol/vol1     = This command make the entry in /etc/exports


   > rdfile /etc/exports


   > exportfs -v /vol/vol1                                         = This command will export particular volume in   
                                                                                         /etc/exports file.


7. To check the exported volume or qtree

   > exportfs -c 10.10.10.10 /vol/vol1                     = This command will check the access

   > exportfs                                                            = This command show list from nfs memory

8. Create on directory in server

   > mkdir /mount


   Syntax:  mount filler ip address: volume or qtree path /mount point

   > mount 10.10.10.11:/vol/vol1 /mount                = vol1 is mount in the /mount directory in the server  

   > cd /mount                                                          = Get in to mount directory  

   > mkdir test_folder                                             = make directory in the mounted directory

9. Permanent mounting in server side for consistency reboot

   > service nfs restart

   > chkconfig nfs on ( consistency reboot )


   > cat  /etc/fstab (depends on UNIX Server (OS))

   Syntax for FSTAB: (linux) and entry depends on UNIX Server (OS)

     <file system>                 <dir>        <type>    <options>    <dump>   <pass>

   > 10.10.10.10:/vol/vol1    /mount          -               -                -              -


   > Press Ctrl+c                                                     = To save and exit from cat command

10. Now NFS is working properly

NetApp FC LUN Allocation on Windows Server


PURPOSE

The purpose of this document is to provide guidance and training on LUN assigning to a windows environment using NetApp technologies

Hardware Setup


NetApp FAS 960 (1 Nos), Brocade 200E switch (1 Nos), Windows 2003 Server with Emulex HBA installed

Connectivity Diagram


Prerequisites

Storage Configuration Prerequisites 

· FCP License should be added

· FCP Service should be started

· Management IP should be configured for accessing the filer view

· Login credential should be available for accessing the filer view

· HTTPD options should be ON for accessing the filer view.

· Host HBA WWPNs should be available before creating Igroup.

1.2 Server Configuration Prerequisites

· Windows server with HBA installed

· HBAnyware utility (for Emulex HBAs) should be installed.

· NetApp DSM should be installed in case of multipathing (Not applicable in this scenario)

· Windows credentials for logging in

Brocade switch Configuration Prerequisites

· Cable connectivity to the storage should be proper

· Cable connectivity to the host should be proper

· Zoning should be proper

· Note down the Host and Storage WWPNs before creating zone.

· Switch credentials for loging in

PROCEDURE


FINDING WWPN OF HOST HBA 

1. Login to the windows server, Open the HBAnyware utility,

2. Note down the WWPNs of the host HBAs


3. Open the Brocade Switch console
4. Select port admin in switch console window, then below console will open,
5. Select every port in the left side and click Devices details,


6. In which port you find the same server wwpn number means that port is connected in the server


7. In which port you find the Netapp filer wwpn number means that port is connected in the Filer,


8. Now port 3 and port 10 is connected in the switch, next we need to do Zoning for the two ports,


 9.  Click on Zone Admin tab, the below tab will open,
10. Select the zone tab on the new window,
11. Click on new zone and name the new zone(Zone_C_WINDOWS). 


12. After Created new zone name, select the newly created zone add the WWPNs of Host and Storage


Adding the new zone to the switch configuration.

13. Click on Zone config tab and select the newly created zone then add to the zone config.


14. Select the save Config and it prompt for YES or No, Select YES


15. Select Enable Config