Showing posts with label LUN. Show all posts

Friday, July 20, 2012

NetApp FC LUN Allocation on Windows Server


PURPOSE

The purpose of this document is to provide guidance and training on LUN assigning to a windows environment using NetApp technologies

Hardware Setup


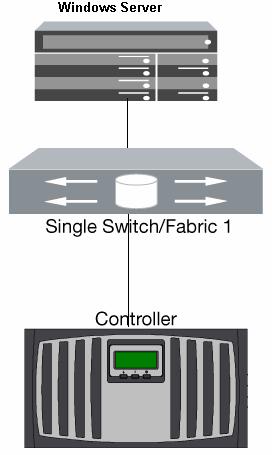
NetApp FAS 960 (1 Nos), Brocade 200E switch (1 Nos), Windows 2003 Server with Emulex HBA installed

Connectivity Diagram


Prerequisites

Storage Configuration Prerequisites 

· FCP License should be added

· FCP Service should be started

· Management IP should be configured for accessing the filer view

· Login credential should be available for accessing the filer view

· HTTPD options should be ON for accessing the filer view.

· Host HBA WWPNs should be available before creating Igroup.

1.2 Server Configuration Prerequisites

· Windows server with HBA installed

· HBAnyware utility (for Emulex HBAs) should be installed.

· NetApp DSM should be installed in case of multipathing (Not applicable in this scenario)

· Windows credentials for logging in

Brocade switch Configuration Prerequisites

· Cable connectivity to the storage should be proper

· Cable connectivity to the host should be proper

· Zoning should be proper

· Note down the Host and Storage WWPNs before creating zone.

· Switch credentials for loging in

PROCEDURE


FINDING WWPN OF HOST HBA 

1. Login to the windows server, Open the HBAnyware utility,

2. Note down the WWPNs of the host HBAs


3. Open the Brocade Switch console
4. Select port admin in switch console window, then below console will open,
5. Select every port in the left side and click Devices details,


6. In which port you find the same server wwpn number means that port is connected in the server


7. In which port you find the Netapp filer wwpn number means that port is connected in the Filer,


8. Now port 3 and port 10 is connected in the switch, next we need to do Zoning for the two ports,


 9.  Click on Zone Admin tab, the below tab will open,
10. Select the zone tab on the new window,
11. Click on new zone and name the new zone(Zone_C_WINDOWS). 


12. After Created new zone name, select the newly created zone add the WWPNs of Host and Storage


Adding the new zone to the switch configuration.

13. Click on Zone config tab and select the newly created zone then add to the zone config.


14. Select the save Config and it prompt for YES or No, Select YES


15. Select Enable Config 


NetApp -Linux iscsi Setup

Step by Step procedure to setup IP SAN using Linux-Netapp-iscsi.

On Linux server :
1.   Install iSCSI initiator (iscsi-initiator-utils rpm) on your linux machine. This will create the necessary binaries and will create /etc/iscsi.conf and /etc/initiatorname.iscsi
2.   Add iscsi-iname to /etc/initiatorname.iscsi .
[root@unixfoo ~]# iscsi-iname
iqn.1987-05.com.cisco:01.44c65d9587d9
[root@unixfoo ~]#

Add the output to /etc/initiatorname.iscsi
3.   Add the below lines to /etc/iscsi.conf
Continuous=no
HeaderDigest=never
DataDigest=never
ImmediateData=yes
DiscoveryAddress=192.185.12.12


DiscoveryAddress should be the IP address of the storage.
On Netapp filer :
1.   Make sure you have iscsi license enabled.
2.   Create volume for holding the iscsi luns.
filer1> vol create iscsivol aggr01 100g
3.   Create lun on the volume
filer1> lun create -s 50g -t linux /vol/iscsivol/lun1
4.   Create an igroup and add the Linux iscsi-iname to it.
filer1> igroup create -i -t linux iscsigrp
filer1> igroup add iscsigrp iqn.1987-05.com.cisco:01.44c65d9587d9
filer1> igroup show
iscsigrp (iSCSI) (ostype: linux):
iqn.1987-05.com.cisco:01.44c65d9587d9 (logged in on: iswta)
filer1>
5.   Map the lun to the iscsi-group.
filer1> lun map /vol/iscsivol/lun1 iscsigrp 0
6.   Enable only one interface for iscsi use and disable others
filer1> iswt interface disable e7
filer1> iswt interface show
Interface e0 disabled
Interface e4 enabled
Interface e5 disabled
Interface e7 disabled
filer1>
7.   Done on the Netapp side.

On Linux again :
1.   Start iscsi initiator
[root@unixfoo ~]# /etc/init.d/iscsi start
Checking iscsi config: [ OK ]
Loading iscsi driver: [ OK ]
Starting iscsid: [ OK ]
[root@unixfoo ~]#
2.   Set iscsi initiator to start automatically after reboot.
[root@unixfoo ~]# chkconfig iscsi on
3.   Check whether the iscsi lun shows up on the linux machine.
[root@unixfoo ~]# iscsi-ls
*******************************************************************************
SFNet iSCSI Driver Version ...4:0.1.11-3(02-May-2006)
*******************************************************************************
TARGET NAME : iqn.1992-08.com.netapp:sn.50380528
TARGET ALIAS :
HOST ID : 2
BUS ID : 0
TARGET ID : 0
TARGET ADDRESS : 192.185.12.12:3260,2
SESSION STATUS : ESTABLISHED AT Sat Dec 29 21:55:37 PST 2007
SESSION ID : ISID 00023d000001 TSIH 501

DEVICE DETAILS:
---------------
LUN ID : 0
Vendor: NETAPP Model: LUN Rev: 0.2
Type: Direct-Access ANSI SCSI revision: 04
page83 type3: 60a980004f6444662653053584516d34
page80: 4f6444516d344305358066265a
Device: /dev/sdb

*******************************************************************************
[root@unixfoo ~]#
4.   Now you have a new device in your linux box (/dev/sdb) - that is your iscsi device. You can create filesystem on it and use it.

Friday, June 29, 2012

NetApp : LUN Setup using Filerview


NetApp :  LUN Setup

To open a filerview: http://HOSTNAME


 If you press filerview, it asks for an authentication.


Once successfully authenticated you get this page.


Open LUN setup wizard.

Create a LUN with the volumename and size specification.


Successfully LUN created.

To Manage a LUN. After creating a LUN we need to map it. For mapping, we need to create a initiator group.


Press to Add an initiator group.


In windows 2003 server, install the iscsi initiator. Open the iscsi initiator and find the iqn value.


To create an iscsi initator group add the iqn value in netapp.


To check, go to manage.


Map the LUN to the existing Igroup name.


 Select the igroup name.


Successfully mapped.


In windows 2003 server add the iscsi target portal.


Now the LUN connected.


To check this, open the device manager.


To initialize the disk.


Disk Added. 

Disk Formatted and healthy.

 Now the disk mounted in drive.


We can able to create a files and folders.