Friday, July 20, 2012

Configure Storage System for NFS Redhat Linux (UNIX)


CONFIGURE STORAGE SYSTEM FOR NFS REDHAT LINUX (UNIX)


1. Execute the Setup command.

    > setup


2. If need create the aggregate and volume or use existing volume.


3. Record the IP address and host name for each entry in the /etc/hosts and check

    > ping xxx.xxx.xxx.xxx
    > ping Server Name

4. NFS will automatic export when volume created, to avoid

    > options nfs.export.auto-update off

5. Check whether NFS is license if not, add license using

    > license add xxxxxxx

5. Check the qtree security is in UNIX, if not

    > qtree security  ( volume path | qtree path ) UNIX


6. export the volume or qtree using exportfs command

   Syntax: exportfs -io rw,root="Host IP addrress"  volume path

   > exportfs -io rw,root=10.10.10.10   /vol/vol1    = This entry in memory not in /etc/exports


   > exportfs 


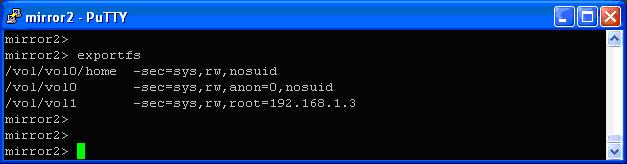
   > exportfs -p  rw,root=10.10.10.10  /vol/vol1     = This command make the entry in /etc/exports


   > rdfile /etc/exports


   > exportfs -v /vol/vol1                                         = This command will export particular volume in   
                                                                                         /etc/exports file.


7. To check the exported volume or qtree

   > exportfs -c 10.10.10.10 /vol/vol1                     = This command will check the access

   > exportfs                                                            = This command show list from nfs memory

8. Create on directory in server

   > mkdir /mount


   Syntax:  mount filler ip address: volume or qtree path /mount point

   > mount 10.10.10.11:/vol/vol1 /mount                = vol1 is mount in the /mount directory in the server  

   > cd /mount                                                          = Get in to mount directory  

   > mkdir test_folder                                             = make directory in the mounted directory

9. Permanent mounting in server side for consistency reboot

   > service nfs restart

   > chkconfig nfs on ( consistency reboot )


   > cat  /etc/fstab (depends on UNIX Server (OS))

   Syntax for FSTAB: (linux) and entry depends on UNIX Server (OS)

     <file system>                 <dir>        <type>    <options>    <dump>   <pass>

   > 10.10.10.10:/vol/vol1    /mount          -               -                -              -


   > Press Ctrl+c                                                     = To save and exit from cat command

10. Now NFS is working properly

NetApp FC LUN Allocation on Windows Server


PURPOSE

The purpose of this document is to provide guidance and training on LUN assigning to a windows environment using NetApp technologies

Hardware Setup


NetApp FAS 960 (1 Nos), Brocade 200E switch (1 Nos), Windows 2003 Server with Emulex HBA installed

Connectivity Diagram


Prerequisites

Storage Configuration Prerequisites 

· FCP License should be added

· FCP Service should be started

· Management IP should be configured for accessing the filer view

· Login credential should be available for accessing the filer view

· HTTPD options should be ON for accessing the filer view.

· Host HBA WWPNs should be available before creating Igroup.

1.2 Server Configuration Prerequisites

· Windows server with HBA installed

· HBAnyware utility (for Emulex HBAs) should be installed.

· NetApp DSM should be installed in case of multipathing (Not applicable in this scenario)

· Windows credentials for logging in

Brocade switch Configuration Prerequisites

· Cable connectivity to the storage should be proper

· Cable connectivity to the host should be proper

· Zoning should be proper

· Note down the Host and Storage WWPNs before creating zone.

· Switch credentials for loging in

PROCEDURE


FINDING WWPN OF HOST HBA 

1. Login to the windows server, Open the HBAnyware utility,

2. Note down the WWPNs of the host HBAs


3. Open the Brocade Switch console
4. Select port admin in switch console window, then below console will open,
5. Select every port in the left side and click Devices details,


6. In which port you find the same server wwpn number means that port is connected in the server


7. In which port you find the Netapp filer wwpn number means that port is connected in the Filer,


8. Now port 3 and port 10 is connected in the switch, next we need to do Zoning for the two ports,


 9.  Click on Zone Admin tab, the below tab will open,
10. Select the zone tab on the new window,
11. Click on new zone and name the new zone(Zone_C_WINDOWS). 


12. After Created new zone name, select the newly created zone add the WWPNs of Host and Storage


Adding the new zone to the switch configuration.

13. Click on Zone config tab and select the newly created zone then add to the zone config.


14. Select the save Config and it prompt for YES or No, Select YES


15. Select Enable Config 


NetApp -Linux iscsi Setup

Step by Step procedure to setup IP SAN using Linux-Netapp-iscsi.

On Linux server :
1.   Install iSCSI initiator (iscsi-initiator-utils rpm) on your linux machine. This will create the necessary binaries and will create /etc/iscsi.conf and /etc/initiatorname.iscsi
2.   Add iscsi-iname to /etc/initiatorname.iscsi .
[root@unixfoo ~]# iscsi-iname
iqn.1987-05.com.cisco:01.44c65d9587d9
[root@unixfoo ~]#

Add the output to /etc/initiatorname.iscsi
3.   Add the below lines to /etc/iscsi.conf
Continuous=no
HeaderDigest=never
DataDigest=never
ImmediateData=yes
DiscoveryAddress=192.185.12.12


DiscoveryAddress should be the IP address of the storage.
On Netapp filer :
1.   Make sure you have iscsi license enabled.
2.   Create volume for holding the iscsi luns.
filer1> vol create iscsivol aggr01 100g
3.   Create lun on the volume
filer1> lun create -s 50g -t linux /vol/iscsivol/lun1
4.   Create an igroup and add the Linux iscsi-iname to it.
filer1> igroup create -i -t linux iscsigrp
filer1> igroup add iscsigrp iqn.1987-05.com.cisco:01.44c65d9587d9
filer1> igroup show
iscsigrp (iSCSI) (ostype: linux):
iqn.1987-05.com.cisco:01.44c65d9587d9 (logged in on: iswta)
filer1>
5.   Map the lun to the iscsi-group.
filer1> lun map /vol/iscsivol/lun1 iscsigrp 0
6.   Enable only one interface for iscsi use and disable others
filer1> iswt interface disable e7
filer1> iswt interface show
Interface e0 disabled
Interface e4 enabled
Interface e5 disabled
Interface e7 disabled
filer1>
7.   Done on the Netapp side.

On Linux again :
1.   Start iscsi initiator
[root@unixfoo ~]# /etc/init.d/iscsi start
Checking iscsi config: [ OK ]
Loading iscsi driver: [ OK ]
Starting iscsid: [ OK ]
[root@unixfoo ~]#
2.   Set iscsi initiator to start automatically after reboot.
[root@unixfoo ~]# chkconfig iscsi on
3.   Check whether the iscsi lun shows up on the linux machine.
[root@unixfoo ~]# iscsi-ls
*******************************************************************************
SFNet iSCSI Driver Version ...4:0.1.11-3(02-May-2006)
*******************************************************************************
TARGET NAME : iqn.1992-08.com.netapp:sn.50380528
TARGET ALIAS :
HOST ID : 2
BUS ID : 0
TARGET ID : 0
TARGET ADDRESS : 192.185.12.12:3260,2
SESSION STATUS : ESTABLISHED AT Sat Dec 29 21:55:37 PST 2007
SESSION ID : ISID 00023d000001 TSIH 501

DEVICE DETAILS:
---------------
LUN ID : 0
Vendor: NETAPP Model: LUN Rev: 0.2
Type: Direct-Access ANSI SCSI revision: 04
page83 type3: 60a980004f6444662653053584516d34
page80: 4f6444516d344305358066265a
Device: /dev/sdb

*******************************************************************************
[root@unixfoo ~]#
4.   Now you have a new device in your linux box (/dev/sdb) - that is your iscsi device. You can create filesystem on it and use it.

Netapp VIF tutorial

Step by Step VIF Configuration :


VIF CONFIGURATION:


Virtual Interface  now it is called as Interface group.(OnTap 8.x onwards)

VIF allow trunking of  one or more Ethernet interfaces.


There are two types of VIF:

  1. Single Mode (Active – Passive  Fail Over)
    1. Only one interface is active.
    2. Other interfaces are in standby.
    3. Fault Tolerance 
  2.  Multi Mode ( Active – Active Load Balancing)
    1. All interfaces are active.
    2. Shares the same MAC address.
    3. Fault Tolerance
    4. Higher Throughput


Load balancing is supported for Multi mode VIF only.
                IP based
                MAC Based
                Round Robin


For VIF configuration, you have to down the interfaces.

FASSENTHIL> ifconfig e0a down
FASSENTHIL> ifconfig e0b down

FASSENTHIL> vif create vifname <interfaces>
FASSENTHIL>vif create vif1 e0a e0b
FASSENTHIL>vif status
FASSENTHIL>ifconfig vif1 10.0.0.121

FASSENTHIL>vif status


Screen shots:

Using ifconfig command, check the network interfaces.


Down the network interface cards using ifconfig <interfacename> down.


vif create single|Multi <vifname> <interfaces>
vif create single vif1 ns0 ns1
vif status


Now, set the ipaddress for the new vif.


ifconfig vif1 <ipaddress>


ifconfig -a .


Now, the interfaces are trunked.


If you check, the ns0 interface is active and ns1 interface is in passive mode.


If ns0 network interface will down, then ns1 will be changed to active.


Netapp Snap manager for Oracle tutorial


NetApp Snap Manager for oracle Tutorial


NetApp Snap Manager Installation and Configuration:
Snap Manager from a DBA perspective:

SnapManager for Oracle simplifies backing up data in Oracle databases for database administrators (DBA). SnapManager provides the following benefits to database administrators:
Creates a backup quickly and in a space-efficient way, which lets you perform more backups
Organizes information into a group, such as a profile, to make creating backups and restoring and recovering data quick and easy
Automatically maps the database files to the storage. You no longer need to know the underlying storage system
Integrates with existing Oracle tools, such as Recovery Manager (RMAN) and Automatic Storage Management (ASM)
Creates Snapshot copies of logs
Quickly creates a clone of a database
Reduces the mean time to recover a database by using SnapRestore


SnapManager from a storage administrator perspective:

SnapManager for Oracle makes managing the storage required for backups easier for a storage administrator. SnapManager provides the following benefits to storage administrators:
Handles different protocols (FCP, iSCSI, and NFS)
Gives you options to optimize backups based on the type of backup (complete or partial) that works best in your environment
Makes backing up databases quick and space-efficient, so you can do them more frequently, if necessary
Creates quick and space-efficient clones
Works with host volume managers

Snap manager works with snap drive and flex clone products.


NetApp Snap Manager for Oracle:


Specify the install location.


Specify the user name and password.


Pre-Installation  Summary.


Installation  Successfully Completed.


 Access the Snap manager for oracle through CLI.


All commands are start with smo.


smo system verify  ---- To verify the system. 


It checked the snap drive is installed or not.


To install Snap Manager for Oracle GUI. Access through the URL:


https://<your server name>:27214 


Launch the SMO.


Create a new repository.


Specify the database name and port number.


DBA user name and password.


Installation Summary.


Creating a repository.


Repository successfully Created.


Creating a profile.


Target database information.


Creating Backup.


Integrating through RMAN or without RMAN.


Summary of profile creation wizard.


Successfully Profile created.


Creating backup of existing database.


Backup wizard.

Select Online backup or Offline Backup.


Full database or Partial Database.


 Backup configuration summary.


Taking online backup.